
HTTP Compression

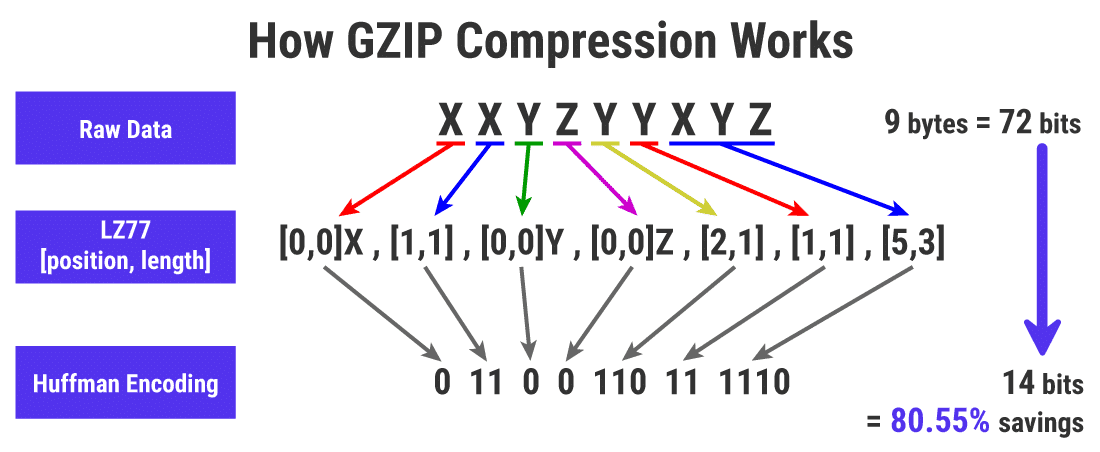
When a server delivers some messages to a client using an HTTP protocol, data compression may be performed to save bandwidth. It can make the data size becomes smaller with the cost of CPU processes. Node.js has a built-in library to handle compression, as I mentioned in another post. For instance, we will see an HTTP server built on Fastify that utilizes the zlib module to compress data returned by the server module in the following code.

import Fastify, { FastifyInstance } from 'fastify';
import { join } from 'path';
import { createReadStream } from 'fs';
import zlib from 'zlib';

const PORT = 3000;
const fastify: FastifyInstance = Fastify({ logger: true });

fastify.get('/', (request, reply) => {
  // get request header
  const acceptEncoding = request.headers['accept-encoding'] || '';
  const rawStream = createReadStream(join(process.cwd(), 'text.txt'));
  reply.header('Content-Type', 'text/plain');

  // if accepted encoding contains gzip
  if (acceptEncoding.includes('gzip')) {
    // send compressed data
    reply.header('Content-Encoding', 'gzip');
    reply.send(rawStream.pipe(zlib.createGzip()));
  } else {
    // send raw data
    reply.send(rawStream);
  }
});

fastify.listen({ port: PORT }, (err, addr) => {
  if (err) {
    fastify.log.error(err);
  } else {
    console.log(`Server is listening on ${addr}`);
  }
});
In the example above, we first read a text file containing a sentence. Then, in the router handler, we define some tasks.
  1. Check the Accept-Encoding header in the request.
  2. If the requester accepts the data that will be sent to be compressed, we can pass the raw data into the zlib function.
  3. Add the Content-Encoding header in the response if the data is compressed.

We can test the result and count the number of bytes returned using the wc command available in the Unix shell. Firstly, we send requests to the server without any header parameter.

curl http://localhost:3000 | wc -c

Secondly, we set a header for accepting compression.

curl -H 'Accept-Encoding: gzip' http://localhost:3000 | wc -c

The result may be unlike what you are expecting where the first one returns less number of bytes than the second one. It is caused by a compression mechanism that will work effectively if there are some repetitions in the content. Let's update the content of the text file with several similar words, phrases, or sentences. Then, run again the commands with and without the encoding header.

In a real scenario, the compression process should be delegated to a web server or reverse proxy server to lighten up the main application load. Nginx has provided the GZip compression option at its core. The following example shows some parameters that can be used in the HTTP block of the Nginx configuration.

# ...
gzip on;
gzip_disable "msie6";
gzip_vary on;
gzip_comp_level 6;
gzip_buffers 16 8k;
gzip_http_version 1.1;
gzip_min_length 256;
gzip_types
  font/otf
  font/ttf
  image/svg+xml
  text/css
  text/javascript
  text/plain
# ...


Comments

Popular posts from this blog

Configuring Swap Memory on Ubuntu Using Ansible

If we maintain a Linux machine with a low memory capacity while we are required to run an application with high memory consumption, enabling swap memory is an option. Ansible can be utilized as a helper tool to automate the creation of swap memory. A swap file can be allocated in the available storage of the machine. The swap file then can be assigned as a swap memory. Firstly, we should prepare the inventory file. The following snippet is an example, you must provide your own configuration. [server] 192.168.1.2 [server:vars] ansible_user=root ansible_ssh_private_key_file=~/.ssh/id_rsa Secondly, we need to prepare the task file that contains not only the tasks but also some variables and connection information. For instance, we set /swapfile  as the name of our swap file. We also set the swap memory size to 2GB and the swappiness level to 60. - hosts: server become: true vars: swap_vars: size: 2G swappiness: 60 For simplicity, we only check the exi

Installing VSCode Server Manually on Ubuntu

I've ever gotten stuck on updating the VSCode server on my remote server because of an unstable connection between my remote server and visualstudio.com that host the updated server source codes. The download and update process failed over and over so I couldn't remotely access my remote files through VSCode. The solution is by downloading the server source codes through a host with a stable connection which in my case I downloaded from a cloud VPS server. Then I transfer the downloaded source codes as a compressed file to my remote server through SCP. Once the file had been on my remote sever, I extracted them and align the configuration. The more detailed steps are as follows. First, we should get the commit ID of our current VSCode application by clicking on the About option on the Help menu. The commit ID is a hexadecimal number like  92da9481c0904c6adfe372c12da3b7748d74bdcb . Then we can download the compressed server source codes as a single file from the host.

Rangkaian Sensor Infrared dengan Photo Dioda

Keunggulan photodioda dibandingkan LDR adalah photodioda lebih tidak rentan terhadap noise karena hanya menerima sinar infrared, sedangkan LDR menerima seluruh cahaya yang ada termasuk infrared. Rangkaian yang akan kita gunakan adalah seperti gambar di bawah ini. Pada saat intensitas Infrared yang diterima Photodiode besar maka tahanan Photodiode menjadi kecil, sedangkan jika intensitas Infrared yang diterima Photodiode kecil maka tahanan yang dimiliki photodiode besar. Jika  tahanan photodiode kecil  maka tegangan  V- akan kecil . Misal tahanan photodiode mengecil menjadi 10kOhm. Maka dengan teorema pembagi tegangan: V- = Rrx/(Rrx + R2) x Vcc V- = 10 / (10+10) x Vcc V- = (1/2) x 5 Volt V- = 2.5 Volt Sedangkan jika  tahanan photodiode besar  maka tegangan  V- akan besar  (mendekati nilai Vcc). Misal tahanan photodiode menjadi 150kOhm. Maka dengan teorema pembagi tegangan: V- = Rrx/(Rrx + R2) x Vcc V- = 150 / (150+10) x Vcc V- = (150/160) x 5

Managing MongoDB Records Using NestJS and Mongoose

NestJS is a framework for developing Node.js-based applications. It provides an additional abstraction layer on top of Express or other HTTP handlers and gives developers a stable foundation to build applications with structured procedures. Meanwhile, Mongoose is a schema modeling helper based on Node.js for MongoDB. There are several main steps to be performed for allowing our program to handle MongoDB records. First, we need to add the dependencies which are @nestjs/mongoose , mongoose , and @types/mongoose . Then, we need to define the connection configuration on the application module decorator. import { MongooseModule } from '@nestjs/mongoose'; @Module({ imports: [ MongooseModule.forRoot('mongodb://localhost:27017/mydb'), ], controllers: [AppController], providers: [AppService], }) Next, we create the schema definition using helpers provided by NestJS and Mongoose. The following snippet is an example with a declaration of index setting and an o

Resize VirtualBox LVM Storage

VirtualBox is a free solution to host virtual machines on your computer. It provides configuration options for many components on our machine such as memory, storage, networking, etc. It also allows us to resize our machine storage after its operating system is installed. LVM is a volume manager in a Linux platform that helps us to allocate partitions in the system and configure the storage size that will be utilized for a specific volume group. There are some points to be noticed when we work with LVM on VirtualBox to resize our storage. These are some steps that need to be performed. 1. Stop your machine before resizing the storage. 2. Set new storage size using GUI by selecting " File > Virtual Media Manager > Properties " then find the desired virtual hard disk name that will be resized. OR , by running a CLI program located in " Program Files\Oracle\VirtualBox\VBoxManage.exe ".  cd "/c/Program Files/Oracle/VirtualBox" ./VBoxManage.exe list

Beautiful Rain (JDorama)

Saya selalu tertarik dengan film-film inspirasional, baik movie atau pun serial drama. Akhir-akhir ini saya tertarik untuk menonton drama serial jepang. Saya googling dengan keyword "inspirational japan dorama" kemudian saya dapati sejumlah review  beberapa film bagus dari sejumlah netizen.  Salah satu yang kemudian saya tonton adalah Beautiful Rain . Setiap episode film ini selalu membuat saya sangat terharu sampai meneteskan air mata. :' Yah, ini mungkin saja karena saya yang terlalu melankolis. Hahaha. Ini sedikit review dari saya tentang film ini.