
Resize VirtualBox LVM Storage

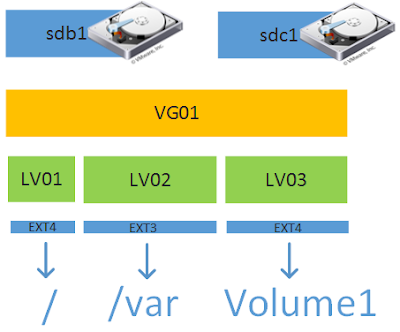
VirtualBox is a free solution to host virtual machines on your computer. It provides configuration options for many components on our machine such as memory, storage, networking, etc. It also allows us to resize our machine storage after its operating system is installed. LVM is a volume manager in a Linux platform that helps us to allocate partitions in the system and configure the storage size that will be utilized for a specific volume group. There are some points to be noticed when we work with LVM on VirtualBox to resize our storage. These are some steps that need to be performed.

1. Stop your machine before resizing the storage.

2. Set new storage size using GUI by selecting "File > Virtual Media Manager > Properties" then find the desired virtual hard disk name that will be resized. OR, by running a CLI program located in "Program Files\Oracle\VirtualBox\VBoxManage.exe". 

cd "/c/Program Files/Oracle/VirtualBox"
./VBoxManage.exe list hdds
./VBoxManage.exe modifyhd <UUID> --resize <size in MB>

3. Run your machine

4. Check your virtual group path by running df -lh, then find a path that is mounted on /. For example, it may be displayed similar to /dev/mapper/ubuntu--vg-ubuntu--lv

5. Check un-partitioned disk by running fdisk -l

6. If an error message like "GPT PMBR size mismatch (20971519 != 61439999) will be corrected by w(rite)." is shown, it means we utilize GPT partitioned drives. Run parted -l then type "Fix". If you run fdisk -l, an error message won't be displayed.

7. Add a new partition.

  • fdisk /dev/sda
  • m to see available commands
  • n create a new partition
  • The partition number is set to the default value
  • The first sector is set to the default value. It is based on the last sector of the existing partition + 1.
  • The last sector is set to the default value
  • p to show partitions table
  • w write changes

8. Check virtual group name by running pvscan. For example, "ubuntu-vg"

9. Review the new partition number, for example, "/dev/sda4". Create physical volume for the new partition by running pvcreate /dev/sda4.

10. Extend new physical volume to a virtual group by running vgextend ubuntu-vg /dev/sda4.

11. Review virtual group path, for example, "/dev/mapper/ubuntu--vg-ubuntu--lv", expand the size by running lvextend -l +100%FREE /dev/mapper/ubuntu--vg-ubuntu--lv

12. Resize file system by running resize2fs /dev/mapper/ubuntu--vg-ubuntu--lv


Comments

Popular posts from this blog

Rangkaian Sensor Infrared dengan Photo Dioda

Keunggulan photodioda dibandingkan LDR adalah photodioda lebih tidak rentan terhadap noise karena hanya menerima sinar infrared, sedangkan LDR menerima seluruh cahaya yang ada termasuk infrared. Rangkaian yang akan kita gunakan adalah seperti gambar di bawah ini. Pada saat intensitas Infrared yang diterima Photodiode besar maka tahanan Photodiode menjadi kecil, sedangkan jika intensitas Infrared yang diterima Photodiode kecil maka tahanan yang dimiliki photodiode besar. Jika  tahanan photodiode kecil  maka tegangan  V- akan kecil . Misal tahanan photodiode mengecil menjadi 10kOhm. Maka dengan teorema pembagi tegangan: V- = Rrx/(Rrx + R2) x Vcc V- = 10 / (10+10) x Vcc V- = (1/2) x 5 Volt V- = 2.5 Volt Sedangkan jika  tahanan photodiode besar  maka tegangan  V- akan besar  (mendekati nilai Vcc). Misal tahanan photodiode menjadi 150kOhm. Maka dengan teorema pembagi tegangan: V- = Rrx/(Rrx + R2) x Vcc V- = 150 / (150+10) x Vcc V- = (150/160) x 5

Setting Up Next.js Project With ESLint, Typescript, and AirBnB Configuration

If we initiate a Next.js project using the  create-next-app tool, our project will be included with ESLint configuration that we can apply using yarn run lint . By default, the tool installs eslint-config-next and extends next/core-web-vitals in the ESLint configuration. The Next.js configuration has been integrated with linting rules for React and several other libraries and tools. yarn create next-app --typescript For additional configuration such as AirBnB, it is also possible. First, we need to install the peer dependencies of eslint-config-airbnb . We also add support for Typescript using eslint-config-airbnb-typescript . yarn add --dev eslint-config-airbnb eslint-plugin-import eslint-plugin-jsx-a11y eslint-plugin-react eslint-plugin-react-hooks yarn add --dev eslint-config-airbnb-typescript @typescript-eslint/eslint-plugin @typescript-eslint/parser After that, we can update the .eslintrc.json file for the new configuration. { "extends": [ "airb

Configuring Swap Memory on Ubuntu Using Ansible

If we maintain a Linux machine with a low memory capacity while we are required to run an application with high memory consumption, enabling swap memory is an option. Ansible can be utilized as a helper tool to automate the creation of swap memory. A swap file can be allocated in the available storage of the machine. The swap file then can be assigned as a swap memory. Firstly, we should prepare the inventory file. The following snippet is an example, you must provide your own configuration. [server] 192.168.1.2 [server:vars] ansible_user=root ansible_ssh_private_key_file=~/.ssh/id_rsa Secondly, we need to prepare the task file that contains not only the tasks but also some variables and connection information. For instance, we set /swapfile  as the name of our swap file. We also set the swap memory size to 2GB and the swappiness level to 60. - hosts: server become: true vars: swap_vars: size: 2G swappiness: 60 For simplicity, we only check the exi

Managing MongoDB Records Using NestJS and Mongoose

NestJS is a framework for developing Node.js-based applications. It provides an additional abstraction layer on top of Express or other HTTP handlers and gives developers a stable foundation to build applications with structured procedures. Meanwhile, Mongoose is a schema modeling helper based on Node.js for MongoDB. There are several main steps to be performed for allowing our program to handle MongoDB records. First, we need to add the dependencies which are @nestjs/mongoose , mongoose , and @types/mongoose . Then, we need to define the connection configuration on the application module decorator. import { MongooseModule } from '@nestjs/mongoose'; @Module({ imports: [ MongooseModule.forRoot('mongodb://localhost:27017/mydb'), ], controllers: [AppController], providers: [AppService], }) Next, we create the schema definition using helpers provided by NestJS and Mongoose. The following snippet is an example with a declaration of index setting and an o

Enabling Single Webcam for Multiple Applications Access in Linux

A webcam can not be accessed by two or more applications simultaneously. The solution is you can duplicate the video stream and make it available for any application. In short, you create a virtual webcam. First, a webcam is commonly detected on  /dev/video* . Before you go through the steps to duplicate video stream, you should check whether your webcam is working. You can try to capture video using VLC by this command. (For example, your webcam is on  /dev/video0 ) $ vlc v4l2:///dev/video0 If it doesn't work, you can try to change its mode to 0777 and make sure there are no other applications accessing it. If it still doesn't work, you can buy a new webcam. Seriously. Don't buy a cheap and unknown-brand webcam. I have $5 webcam and it had wasted my time. $ apt-get install ffmpeg linux-generic v4l2loopback-dkms FFmpeg is the main application that will access your webcam and duplicate its video stream. V4L2loopback is needed to create multiple virtual capture devic

Configure Gitlab SMTP Setting

Gitlab CE or EE is shipped with the capability to send messages through SMTP service as the basic feature to send notifications or updates to the users. The configuration parameters are available in /etc/gitlab/gitlab.rb . Each SMTP service provider has a different configuration, therefore the Gitlab configuration parameters should be adjusted according to the requirements. Some examples have been provided by Gitlab here . This is an example if you use the Zoho service. gitlab_rails['smtp_enable'] = true gitlab_rails['smtp_address'] = "smtp.zoho.com" gitlab_rails['smtp_port'] = 587 gitlab_rails['smtp_authentication'] = "plain" gitlab_rails['smtp_enable_starttls_auto'] = true gitlab_rails['smtp_user_name'] = "gitlab@mydomain.com" gitlab_rails['smtp_password'] = "mypassword" gitlab_rails['smtp_domain'] = "smtp.zoho.com" This is another example of using Amazon SES w