
HTTP Compression

When a server delivers some messages to a client using an HTTP protocol, data compression may be performed to save bandwidth. It can make the data size becomes smaller with the cost of CPU processes. Node.js has a built-in library to handle compression, as I mentioned in another post. For instance, we will see an HTTP server built on Fastify that utilizes the zlib module to compress data returned by the server module in the following code.

import Fastify, { FastifyInstance } from 'fastify';
import { join } from 'path';
import { createReadStream } from 'fs';
import zlib from 'zlib';

const PORT = 3000;
const fastify: FastifyInstance = Fastify({ logger: true });

fastify.get('/', (request, reply) => {
  // get request header
  const acceptEncoding = request.headers['accept-encoding'] || '';
  const rawStream = createReadStream(join(process.cwd(), 'text.txt'));
  reply.header('Content-Type', 'text/plain');

  // if accepted encoding contains gzip
  if (acceptEncoding.includes('gzip')) {
    // send compressed data
    reply.header('Content-Encoding', 'gzip');
    reply.send(rawStream.pipe(zlib.createGzip()));
  } else {
    // send raw data
    reply.send(rawStream);
  }
});

fastify.listen({ port: PORT }, (err, addr) => {
  if (err) {
    fastify.log.error(err);
  } else {
    console.log(`Server is listening on ${addr}`);
  }
});
In the example above, we first read a text file containing a sentence. Then, in the router handler, we define some tasks.
  1. Check the Accept-Encoding header in the request.
  2. If the requester accepts the data that will be sent to be compressed, we can pass the raw data into the zlib function.
  3. Add the Content-Encoding header in the response if the data is compressed.

We can test the result and count the number of bytes returned using the wc command available in the Unix shell. Firstly, we send requests to the server without any header parameter.

curl http://localhost:3000 | wc -c

Secondly, we set a header for accepting compression.

curl -H 'Accept-Encoding: gzip' http://localhost:3000 | wc -c

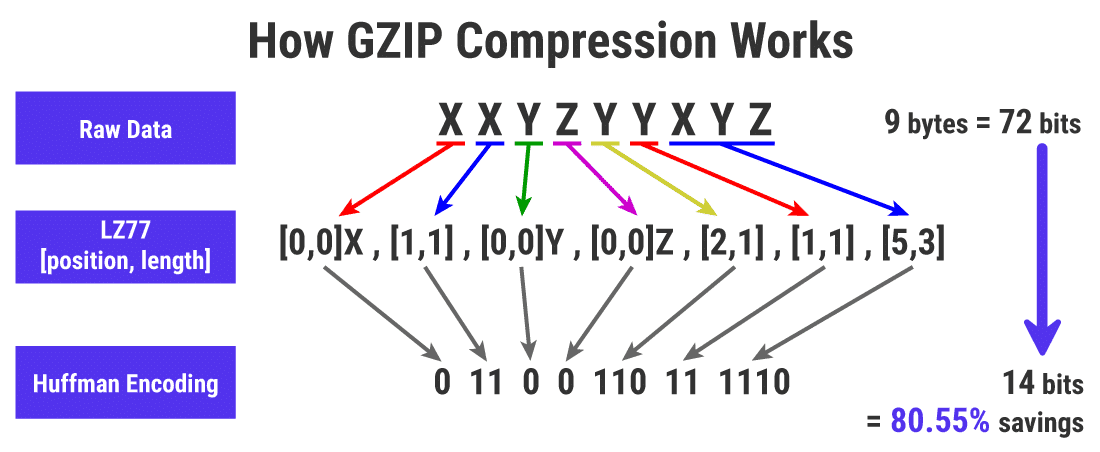
The result may be unlike what you are expecting where the first one returns less number of bytes than the second one. It is caused by a compression mechanism that will work effectively if there are some repetitions in the content. Let's update the content of the text file with several similar words, phrases, or sentences. Then, run again the commands with and without the encoding header.

In a real scenario, the compression process should be delegated to a web server or reverse proxy server to lighten up the main application load. Nginx has provided the GZip compression option at its core. The following example shows some parameters that can be used in the HTTP block of the Nginx configuration.

# ...
gzip on;
gzip_disable "msie6";
gzip_vary on;
gzip_comp_level 6;
gzip_buffers 16 8k;
gzip_http_version 1.1;
gzip_min_length 256;
gzip_types
  font/otf
  font/ttf
  image/svg+xml
  text/css
  text/javascript
  text/plain
# ...

Comments

  1. Looking through this impressive website, beardlib.com quickly captured my attention with its thoughtful organization and quality content. Everything works smoothly, creating a reliable and satisfying experience for every visitor who arrives.

    ReplyDelete
  2. Warm congratulations to everyone involved, noisium.com reflects professionalism through its excellent content and attractive layout. Every feature is well designed, making browsing smooth and satisfying. Wishing your website continued growth and popularity.

    ReplyDelete
  3. Wonderful effort deserves sincere recognition becausebepisdb.com combines valuable information with elegant presentation. The responsive interface, organized content, and professional appearance create an enjoyable online experience. Keep maintaining these outstanding standards consistently.

    ReplyDelete

Post a Comment

Popular posts from this blog

Deploying a Web Server on UpCloud using Terraform Modules

In my earlier post , I shared an example of deploying UpCloud infrastructure using Terraform from scratch. In this post, I want to share how to deploy the infrastructure using available Terraform modules to speed up the set-up process, especially for common use cases like preparing a web server. For instance, our need is to deploy a website with some conditions as follows. The website can be accessed through HTTPS. If the request is HTTP, it will be redirected to HTTPS. There are 2 domains, web1.yourdomain.com and web2.yourdomain.com . But, users should be redirected to "web2" if they are visiting "web1". There are 4 main modules that we need to set up the environment. Private network. It allows the load balancer to connect with the server and pass the traffic. Server. It is used to host the website. Load balancer. It includes backend and frontend configuration. Dynamic certificate. It is requ...

Installing VSCode Server Manually on Ubuntu

I've ever gotten stuck on updating the VSCode server on my remote server because of an unstable connection between my remote server and visualstudio.com that host the updated server source codes. The download and update process failed over and over so I couldn't remotely access my remote files through VSCode. The solution is by downloading the server source codes through a host with a stable connection which in my case I downloaded from a cloud VPS server. Then I transfer the downloaded source codes as a compressed file to my remote server through SCP. Once the file had been on my remote sever, I extracted them and align the configuration. The more detailed steps are as follows. First, we should get the commit ID of our current VSCode application by clicking on the About option on the Help menu. The commit ID is a hexadecimal number like  92da9481c0904c6adfe372c12da3b7748d74bdcb . Then we can download the compressed server source codes as a single file from the host. ...

Increase of Malicious Activities and Implementation of reCaptcha

In recent time, I've seen the increase of malicious activities such as login attempts or phishing emails to some accounts I manage. Let me list some of them and the actions taken. SSH Access Attempts This happened on a server that host a Gitlab server. Because of this case, I started to limit the incoming traffic to the server using internal and cloud firewall provided by the cloud provider. I limit the exposed ports, connected network interfaces, and allowed protocols. Phishing Attempts This typically happened through email and messaging platform such as Whatsapp and Facebook Page messaging. The malicious actors tried to share a suspicious link lured as invoice, support ticket, or something else. Malicious links shared Spammy Bot The actors leverage one of public endpoint on my website to send emails. Actually, the emails won't be forwarded anywhere except to my own email so this just full my inbox. This bot is quite active, but I'm still not sure what...

How To Discover Exposed Digital Assets for Free Using Noxtara

If you have a website or public-facing digital assets, you might wonder whether they’re secure and what potential entry points could be at risk. A great first step is to list all the digital assets connected to your main domain. One free tool that can help with this is called Noxtara. It offers a variety of security tools in one integrated dashboard, including a feature for discovering public-facing assets. Creating a free account is simple—just head over to the registration page . If you’ve got a company email that matches the domain you want to scan, it’s best to use that since it makes adding the domain to the Noxtara platform much easier. No worries if you don’t have a company email, though; you can still sign up without a problem. Just keep in mind that when you want to add your company’s domain for scanning, you’ll need to go through a quick DNS record check. Registration Once you’ve registered, you can set up a team and add your domain in the team settings. If the domai...

How To Verify Phone Number for Free Using WhatsApp

If you have a product or business that maintains user information like phone numbers, verifying the validity or ownership of the phone number could become important, as the phone number can be used as an authentication method or targeted marketing channel. The typical phone verification procedure is by generating a code or OTP in our application, sending that OTP to the user's phone, and then the user should insert the OTP in our application for verification. The OTP can be sent to the users through services like SMS or WhatsApp that require a valid phone number. For internet-based communication, WhatsApp has become the de facto standard for sending the OTP. WhatsApp requires its users to have a valid phone number during account creation, and it already has a huge number of users, approximately 3 billion in 2025. Using that common procedure, WhatsApp will charge us for each OTP sent. The cost depends on the country of the target phone number. For Indonesia...

Manage Kubernetes Cluster using Rancher

Recently, I sought a simpler method to deploy and maintain Kubernetes clusters across various cloud providers. The goal was to use it for development purposes with the ability to manage the infrastructure and costs effortlessly. After exploring several options, I decided to experiment with Rancher. Rancher offers a comprehensive software stack for teams implementing container technology. It tackles both the operational and security hurdles associated with managing numerous Kubernetes clusters. Additionally, it equips DevOps teams with integrated tools essential for managing containerized workloads. Rancher also offers an open-source version, allowing free deployment within one's infrastructure. The Rancher platform can be deployed either as a Docker container or within a Kubernetes cluster utilizing the K3s engine. We can read the documentation on how to install Rancher on K3s using Helm . Rancher itself enables the creation and provisioning of Kubernetes clusters and ...