
Hardening SSH Security in Linux


SSH is a popular network protocol used to access remote computers through certain networks or the internet. OpenSSH is an application that provides SSH accessibility for a computer or server. A common method used to start a communication with SSH access is by providing a username and password before a secured connection is established. This method is not really safe because you provide credentials in plain text and transfer them through the network. It also makes it any scumbag individuals be easier to guess your password or perform a brute force attack in order to gain your server access. There are several possible ways that I think can be used for hardening your SSH security.
  1. Disable root access
  2. Change SSH port number
  3. Utilize RSA authentication
  4. Disable plain password login

Disable root access

1) Before you disable the root access, you need to make sure that there is another user account on your remote computer.

2) Create a new user as needed.
$ adduser youruser
3) Edit SSH configuration in /etc/ssh/sshd_config. Set new values for several following properties.
PermitRootLogin no
AllowUsers youruser
AllowUsers property is optional. It is used only for limiting access to certain users. You can add more users by separating it using space in the value.

4) Restart SSH service.
$ service sshd restart

Change SSH Port Number

You can change Port property other than 22.

Utilize RSA Authentication

1) Generate private and public keys in your local computer. I prefer to use PuTTYgen because it can generate not only an OpenSSH-compatible key but also a PuTTY-compatible key. PuTTY is a common application for remote access available for Windows. It needs a certain format of the private key with .PPK extension. PuTTYgen is included in PuTTY installation.

2) Open PuTTYgen. Set the number of bits in the generated key (2048, 4096, etc). Click "Generate".

3) After the process was completed, you can get 4 types of keys. First, in the big text box, it is an OpenSSH-compatible public key. Copy the content, paste it to a text editor (e.g. Notepad) and save it as id_rsa.pub. Second, you possibly need to fill in the key passphrase. It adds more security to your private key. Click "Save public key" and save it as id_rsa.putty.pub. Third, click "Save private key" and save as id_rsa.ppk. It's PuTTY-compatible private key. Fourth, choose the "Conversion" menu then choose the "Export OpenSSH key". It will generate an OpenSSH-compatible private key and save it as id_rsa.


4) Now, back to the OpenSSH configuration in the remote server. Set new values for several following properties.
RSAAuthentication yes
PubkeyAuthentication yes
AuthorizedKeysFile %h/.ssh/authorized_keys
The last property means that the OpenSSH application will check any allowed public keys stored in the user authorized_keys file.

5) Copy your user OpenSSH-compatible public key content and append it to 
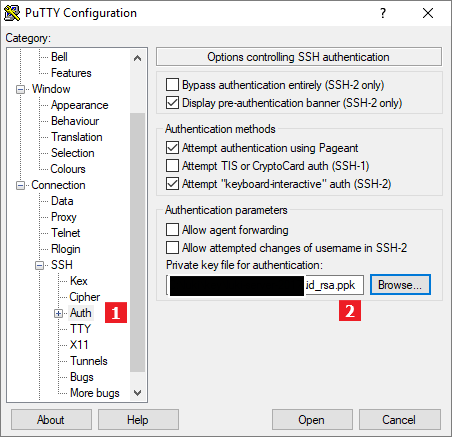
/home/[yur_user]/.ssh/authorized_keys. The .ssh directory should be owned by your user and set its mode to 0700 for security while the authorized_keys mode should be 0600.

6) Back to the local computer and open your PuTTY application. On the Session menu, insert your remote computer address with its user and port. Then, go to Auth menu, choose your PuTTY-compatible private key. Then, back to the Session menu and save your configuration.

Disable plain password login

Before you implement this configuration, you must make sure that the previous process is working. By setting PasswordAuthentication value to "no" will make your server can be accessed only by RSA authentication.

If you think this article is useful, you can share it. Or, if you have any suggestions or questions, please leave them in the comment below.

Comments

Popular posts from this blog

Configuring Swap Memory on Ubuntu Using Ansible

If we maintain a Linux machine with a low memory capacity while we are required to run an application with high memory consumption, enabling swap memory is an option. Ansible can be utilized as a helper tool to automate the creation of swap memory. A swap file can be allocated in the available storage of the machine. The swap file then can be assigned as a swap memory. Firstly, we should prepare the inventory file. The following snippet is an example, you must provide your own configuration. [server] 192.168.1.2 [server:vars] ansible_user=root ansible_ssh_private_key_file=~/.ssh/id_rsa Secondly, we need to prepare the task file that contains not only the tasks but also some variables and connection information. For instance, we set /swapfile  as the name of our swap file. We also set the swap memory size to 2GB and the swappiness level to 60. - hosts: server become: true vars: swap_vars: size: 2G swappiness: 60 For simplicity, we only check the exi

Master Slave Replication to Automatically Backup Your MySQL Database

We can make backup for some databases by periodically running a kind of dump query, like mysqldump in MySQL. That's the simplest method but it can drain our server resources and it's not suitable for large databases. MySQL comes up with master-slave features that allow you to replicate your database to another location (slave). This mechanism enables MySQL to generate a log file which records any action performed to the database. Then, that action will be run in slave database too. For example, we have two database servers with IP address 192.168.0.1 (Master) and 192.168.0.2 (Slave). 1) Configure my.cnf in master server # Master Settings # locate where the changes record will be stored log-bin = /var/log/mysql/mysql-bin.log # set unique ID for master database in master-slave network (up to you) server-id = 111 innodb_flush_log_at_trx_commit = 1 sync_binlog = 1 # select database which will be replicated # by default system will log all databases binlog-do-db =

Installing VSCode Server Manually on Ubuntu

I've ever gotten stuck on updating the VSCode server on my remote server because of an unstable connection between my remote server and visualstudio.com that host the updated server source codes. The download and update process failed over and over so I couldn't remotely access my remote files through VSCode. The solution is by downloading the server source codes through a host with a stable connection which in my case I downloaded from a cloud VPS server. Then I transfer the downloaded source codes as a compressed file to my remote server through SCP. Once the file had been on my remote sever, I extracted them and align the configuration. The more detailed steps are as follows. First, we should get the commit ID of our current VSCode application by clicking on the About option on the Help menu. The commit ID is a hexadecimal number like  92da9481c0904c6adfe372c12da3b7748d74bdcb . Then we can download the compressed server source codes as a single file from the host.

Rangkaian Sensor Infrared dengan Photo Dioda

Keunggulan photodioda dibandingkan LDR adalah photodioda lebih tidak rentan terhadap noise karena hanya menerima sinar infrared, sedangkan LDR menerima seluruh cahaya yang ada termasuk infrared. Rangkaian yang akan kita gunakan adalah seperti gambar di bawah ini. Pada saat intensitas Infrared yang diterima Photodiode besar maka tahanan Photodiode menjadi kecil, sedangkan jika intensitas Infrared yang diterima Photodiode kecil maka tahanan yang dimiliki photodiode besar. Jika  tahanan photodiode kecil  maka tegangan  V- akan kecil . Misal tahanan photodiode mengecil menjadi 10kOhm. Maka dengan teorema pembagi tegangan: V- = Rrx/(Rrx + R2) x Vcc V- = 10 / (10+10) x Vcc V- = (1/2) x 5 Volt V- = 2.5 Volt Sedangkan jika  tahanan photodiode besar  maka tegangan  V- akan besar  (mendekati nilai Vcc). Misal tahanan photodiode menjadi 150kOhm. Maka dengan teorema pembagi tegangan: V- = Rrx/(Rrx + R2) x Vcc V- = 150 / (150+10) x Vcc V- = (150/160) x 5

Resize VirtualBox LVM Storage

VirtualBox is a free solution to host virtual machines on your computer. It provides configuration options for many components on our machine such as memory, storage, networking, etc. It also allows us to resize our machine storage after its operating system is installed. LVM is a volume manager in a Linux platform that helps us to allocate partitions in the system and configure the storage size that will be utilized for a specific volume group. There are some points to be noticed when we work with LVM on VirtualBox to resize our storage. These are some steps that need to be performed. 1. Stop your machine before resizing the storage. 2. Set new storage size using GUI by selecting " File > Virtual Media Manager > Properties " then find the desired virtual hard disk name that will be resized. OR , by running a CLI program located in " Program Files\Oracle\VirtualBox\VBoxManage.exe ".  cd "/c/Program Files/Oracle/VirtualBox" ./VBoxManage.exe list

Setting Up Next.js Project With ESLint, Typescript, and AirBnB Configuration

If we initiate a Next.js project using the  create-next-app tool, our project will be included with ESLint configuration that we can apply using yarn run lint . By default, the tool installs eslint-config-next and extends next/core-web-vitals in the ESLint configuration. The Next.js configuration has been integrated with linting rules for React and several other libraries and tools. yarn create next-app --typescript For additional configuration such as AirBnB, it is also possible. First, we need to install the peer dependencies of eslint-config-airbnb . We also add support for Typescript using eslint-config-airbnb-typescript . yarn add --dev eslint-config-airbnb eslint-plugin-import eslint-plugin-jsx-a11y eslint-plugin-react eslint-plugin-react-hooks yarn add --dev eslint-config-airbnb-typescript @typescript-eslint/eslint-plugin @typescript-eslint/parser After that, we can update the .eslintrc.json file for the new configuration. { "extends": [ "airb